Tuesday, December 19, 2017

Chipolatas and bread sauce recipe

The best bits of Christmas dinner.

The recipe
Peel, then slice in half, 4 medium shallots. Set a wide, shallow pan over a medium heat, add the shallots, then let them soften and colour to a pale gold.

Place 8 plump, herby chipolata sausages among the shallots and let them colour on all sides. Lift out the sausages and keep them warm.

Pour 600ml of full cream milk into the pan, add 2 bayleaves, 4 cloves, a few sprigs of thyme (lemon thyme if you can get it) and bring almost to the boil. Lower the heat and leave to simmer for 3 minutes then stir in 150g fresh breadcrumbs, salt and coarsely ground black pepper, 1 tbsp of grain mustard and 3 tbsp of chopped parsley. Stirring regularly, let the bread sauce thicken and simmer for few minutes.

Warm a little cranberry sauce in a small pan.

Serve the sausages with the bread sauce and a spoonful of cranberry sauce. Enough for 2.

The trick
Creamy, generously seasoned bread sauce and chipolata sausages are the highlight of my Christmas dinner. But the sauce stands or falls by its seasoning. Soft, sweet onions or shallots, bay leaves, cloves and plenty of salt and pepper are to my mind essential. Be lavish with them.

The watchpoint here is to keep the sauce moving in the pan, if you don’t stir almost continuously it will stick and burn.

The twist
Bacon, streaky and smoked, is a fine addition here, bringing with it even more of the essence of a Christmas feast. Add bits of bacon, cut into stamp-sized pieces, as you are browning the sausages. The more crisply you cook the bacon the better.

A few tough herbs, such as rosemary and thyme, would work their magic here, too, finely chopped and stirred in with the cloves.

Thursday, November 16, 2017

A Sweet Dip In The History of India's Favourite Festive Treat

Commonly offered as prasad, Motichoor Ladoo is a favourite festive treat across India. Admit it, once you start having it, you cannot just hold back at one. Motichoor Ladoo or Motichur Ladoo is a round-shaped sweetmeat made from fine, tiny balls of besan. The chickpea flour globules is fried in ghee or oil, and soaked in sugar syrup. The sweet, pearl-like balls are then moulded into ladoos. Motichur Ladoo is originally said to hail from the Northern region of the country, but happens to be a favourite across the country and the world.

The word 'motichoor' literally translates to crushed pearls and honestly we think their couldn't have been a better name for the delicacy. Originally associated with states like Rajasthan and Uttar Pradesh, these ladoos were also easy to store in the torrid temperatures, and wouldn't go bad for days. Motichoor Ladoo has also found its mention in ancient and medieval texts of South and Eastern regions.

Renowned food historian KT Acharya in his book A Historical Dictionary of Indian Food writes about the sweet, "A sphere of fine globules (moti=pearls) of fried besan held together with thickened sugar syrup. A ladoo would have coarser granules. It is mentioned in Kannada literature of a few centuries ago (Supa sastra of Mangarsa, written in 1516 AD), and as a food item of Bihar about a century ago. The sculpted or painted figure of Ganesha frequently holds in one hand what appears to be balls of motichur, as in the great Lingaraja temple of Bhubaneshwar (as recorded by Ayodhya Prasad Shah in the 'Life in Medieval Orissa')."

If we go further back in history, legends suggest that originally ladoos were invented for medicinal purpose by the father of Indian surgery and medicine Susruta. For instance, the Til ke Ladoo that we all relish today, Susruta in the 4th century B.C began using it as an antiseptic to treat his surgical patients, (the combination of sesame seeds, jaggery and peanuts was said to have immense nutritional properties).

Somewhere down the line, ladoos came to being associated with all things festive, happy and yummy. Traditional ingredients to make ladoos were ghee, khoya and jaggery. A turning point for ladoos came with the introduction of sugar in the recipe, and later the mass cultivation of sugar across the country.

On realising that adding sugar can take the sweet quotient multiple times higher, people began adding sugar in great quantity to lure the costumers. It is said that the traditional Boondi Ladoo, also paved way for Motichoor Laddoo as the popularity of sugar syrup caught on. Just like Boondi Laddoo, Motichoor Ladoo was also preferred for its extra shelf life, as they could be carried for long distances.

It used to be and still is a very common habit of carrying Motichoor Laddoos in dabbas for long journey. They were prepared in the same way as Boondi Ladoo, and slowly made its way as one of the most loved sweets in the country.

Motichoor Ladoo has become an intrinsic part of every Indian festivity. With the season of festivals in the offing, we can't wait to binge in on our share. Let us know your favourite Indian sweetmeat for all seasons.

Tuesday, October 10, 2017

How Dal-Chawal May Be the Best Food Combo for a Protein Boost

Healthy eating is not just about picking the first fruit or vegetable you find in front of you. It is also about certain combinations and food pairings. For instance, they say one shouldn't have bananas and milk, or watermelon after dinner. Similarly, you must have heard about a common myth which suggests that legumes must be eaten at the same time as grains to get a "complete" protein. How true is it? Let's find out.

The Explanation

All animal proteins are said to be complete because they provide us all the essential amino acids. Coming to plant-based proteins, leaving soy and quinoa, ingredients like beans, nuts and whole grains are incomplete in nature. But they can be combined with other foods to complete your set of proteins.

Now, legumes contain an essential amino acid called lysine, which is low in many grains. On the other hand, whole grains provide a rich dose of methionine and cysteine, which are low in legumes, beans, peas, lentils and peanuts. In combination, they can complement each other and provide you your essential dose of proteins. So rajma-rice lovers raise your hand, for your protein intake may be just on point as per this logic. One can also pair black bean and corn salad with brown rice, or mixed bean rice salad. The trick is to eat a mix of amino acids throughout the day.

Why is the combination rooted for?
Bangalore-based nutritionist Dr. Anju Sood explains, "Our body calls for the prime nutrients, proteins, carbs and fats. Dals (lentils) and legumes are a high source of vegetarian protein. Often on a high protein diet when you are basing your diet only on protein you tend to miss out on carbs completely. While your metabolism shoots, your body has to function three times harder to make up for the other nutrients, also in many cases, clients complain of increased sugar cravings."

Macrobiotic nutritionist and Health practitioner Shilpa Arora says, "Legumes are great proteins with all their fibre and goodness. The combination of grains and legumes works well if you want a variety of amino acids in a single meal . If you eat a variety of plant-based foods and legumes, you will get your dose of complete protein and nutrition.

She further adds, "In my opinion, hankering behind these minute quanta of nutrition is not required. Eat with pleasure. All lentils and legumes when sprouted are extremely nutritious and also works wonders for digestion."

Other food combinations you can try with your legumes
Pairing legumes with sunflower seeds, sesame seeds or nuts, such as pecans, or walnuts and pistachios also provide complete proteins. You can also include oatmeal with sliced almonds or other nuts, and whole-grain bread with nuts and seeds.

Monday, September 18, 2017

A Delicious Menu for a Memorable Teej Party

Hariyali Teej is an Indian festival which is celebrated with a lot enthusiasm and gusto by women across the Northern states of Rajasthan, Uttar Pradesh, Madhya Pradesh and Bihar. Hariyali Teej falls in the Shravana month, usually two days before Nag Pachami.  The festival is dedicated to Lord Shiva and Goddess Parvati. The Shravana month, also known as Sawan, is considered to be a holy month for observing fasts and worshiping Lord Shiva and Goddess Parvati. This year, the festival will be celebrated on 26th July, 2017.

Hariyali Teej symbolizes the reunion of Lord Shiva and Goddess Parvati which is why it is regarded auspicious for married women.  They worship Goddess Parvati and pray for marital bliss. On the festive day, they visit their parent's home, and deck up beautifully in green Sari and with green bangles which is the significant colour of the festival. 

After performing puja at home, a group of women usually get together to enjoy the festivities by preparing swings (symbolic to the festival), singing Teej songs and snacking on some delicious food. Well, a celebration like this definitely calls for a sumptuous feast. If you are planning to throw a Teej party for your friends and family or your daughter or for your daughter-in-law, here's a fully-planned menu to avoid all the fuss.

Drinks

For drinks, try this refreshing and aromatic Jawant Sharbat by Chef Niru Gupta. It is made with beautiful hibiscus flowers and is definitely an impressive drink. You can even keep a sweet and tangy Pineapple Panna by Chef Rajdeep Kapoor for those who would not like to experiment.

Snacks

It's the perfect weather to enjoy an outdoor tea party with some crispy, crunchy delights. Try this interesting version of our favourite tea-time snack - Mushroom Samosa by Chef Niru Gupta. The Rajasthani Mirchi Vada is a popular street snack from Jodhpur, recreate the magic at home with this easy recipe by Chef Niru Gupta.These small bites are perfect to indulge in without ruining your appetite. For those who are calorie-conscious, these baked bite wrapped in crunchy sesame seeds is the best bet - Til-E-Paneer by Chef Niru Gupta. If you're an experimental cook and you quests are adventurous foodies, these melt-in-mouth Rajma Kebabs are a must on your snack menu.

Main Course

For mains, go for the traditional dishes like the Dal-Baati which is perfect for this nippy weather. Hot, simmering dalserved with ghee-laden baatis is the best combination. Try these absolutely delicious Stuffed Baatis by Chef Sujata Natraj filled with paneer and spices. Along with this, serve a tangy and spicy Palak Mirchi Kadhi by Chef Kunal Kapoor along with a nutty Sesame Seed Pulao by Chef Marut Sikka.

Desserts

For a sweet, sweet ending stick to the classic dessert of the festival - Ghewar but show off your culinary skills by making it at home. This version with a rich topping of malai and nuts by Chef Ashish Deva from Jaisalmer Marriott Resort will win over all your guests. To add a fun element, try these dainty Gulkand Cupcakes by Chef Swasti Aggarwal.

With our simple recipes and this fantastic menu, you can be a part of your Teej festivities and don't have to worry about a thing.

Sunday, August 13, 2017

Green Crabs Are Officially Delicious


Kick over a rock or a chunk of turf along the coast of Maine and chances are a horde of invasive green crabs will scurry out. Since their accidental introduction to the North American coast by European ships in the early 1800s, green crabs have become among the most common creatures in the region. Commercial crabbers and lobster fishermen motor past millions of them every day because the credit card-sized crabs—though perfectly edible—are too small to be worth manually shucking.

A new processing technique explored in a scientific paper by researchers from the University of Maine could change that. By experimenting with a mechanical means of extracting meat from green crabs, they hope to create a market for the ecologically disruptive animals.

As a food scientist who specializes in reducing waste of seafood, researcher Denise Skonberg had long been aware of the Paoli One Step Deboner, a machine that resembles a meat grinder the size of a truck transmission. After workers strip off the chicken meat, carcasses are put in the machine, deboned, and emerge as a paste-like meat product. The machine can also be used for green crabs.

If green crab paste becomes commercially successful, it could become a key part of coastal habitat restorations.

"The cost of fuel would prevent it from being a specifically targeted catch," says Skonberg, one of the paper's three authors. Since fishermen are already on the water for high-value species such as lobsters, they could add the 7.5-centimeter-wide green crabs to their catch. "Instead of killing the crabs or throwing them overboard, they can have a bin for crabs and a bin for lobsters."

A commercial fishery is unlikely to ever completely eradicate green crabs, but reducing their numbers would still benefit ecosystems and humans.

Green crabs alter their habitat in dramatic ways. Their activity, for example, disrupts and kills beds of eelgrass, which serve as essential protective cover for many species of juvenile fish. But most distressing to Mainers, the crabs eat clams in large quantities and compete with young lobsters for food.

The green crab problem has gradually worsened in northern waters. Historically, cold winters limited the population. A New Brunswick study in the 1950s and '60s showed that as temperatures declined, so did the green crab populations. Monitoring traps went from an average of 343 crabs a day in 1956 to 7.5 a day in 1960. But with ocean temperatures warming, crab numbers have risen dramatically.

New introductions of green crabs in ballast water from northern Europe have recently provided cold-tolerant genes to the invasive population. This has probably contributed to the recent population explosion in the cold waters of Maine and Eastern Canada.

As the crab populations expand, perhaps human palates will too.

"Compared to other kinds of crabs, the flavor is sweeter," Skonberg says. The texture of processed meat, however, isn't quite what people expect from crab. "It's more like a puree.

So there are challenges in using the finished product as food, but it is somewhat familiar to North Americans. Green crab puree is a variation of the centuries-old Asian seafood paste surimi. In the 1960s, Japanese researchers applied the principles of surimi production to cheap Alaskan pollock, creating imitation crab legs found in most North American grocery stores today.

Skonberg and her coauthors decided to use the green crab paste in a dish where the fibrous texture of normal crabmeat would not be missed: empanadas. And because this is science rather than just having fun in the kitchen, they conducted organized taste tests and collected data. Sixty-three percent of respondents said that they would "probably" or "definitely" buy crabmeat empanadas if they were available locally.

"It's a realistic idea," says Christina DeWitt, director of the Seafood Lab at Oregon State University, noting that the seafood industry uses all kinds of minced seafood in a variety of products. "I have never thought about surimi for crab, but it's possible. We typically take low-value fish and convert it into surimi that is imitation crab, but this is already a crab."

Thursday, July 20, 2017

Five delicious French desserts that only require a few ingredients

There are French desserts in the vicinity of which you dare not breathe, lest they crumble, deflate, or melt with your disturbance. Quelle horreur! These are the soufflés (all that swell), the puff pastry (all those layers), the petits fours (all the microscopic artistry), the yule logs (all that fake dirt). And please don't get my started on the precious macarons.

Pastry cream, piping bags, Paris Brest, pageantry!

On an ambitious day, I may, er, essaie to make an éclair or a pain au chocolat at home, but throughout that entire journey, I'll know in my heart of hearts that I should have saved time and tears and visited the pâtissiers at the pâtisserie.

These five desserts are not that kind, however. They're low-maintenance (relatively speaking), forgiving, et très facile. They're homey enough to, well, make at home — and make well at home — without taking up your entire afternoon, but they're still delicious enough to impress a guest or two after a soirée.

And — here's the kicker! — they all have just five ingredients, none of which are obscure or particular fancy. Hip hip! (Okay, that's un petite fib — some have six! So sue me.)

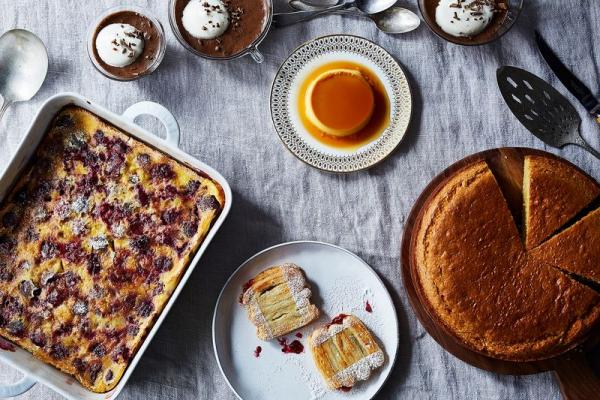
Sans further adieu, the sweet stuff. Ranked from easy to difficult and from quick to time-consuming. Find more recipe details below.

1. THE DESTINY OF YOUR PRECIOUS SUMMER FRUITS

Clafoutis = Fruit + Eggs + Flour + Sugar + Milk

From David Lebovitz, a marshal of French desserts, comes the simplest and fastest treat on this list: clafoutis, a puffed, pancake-y fruit dessert that I might call the French cousin of the Dutch baby were I to get all EU in this article.

All you need is a blender, or a powerful whisking arm, and 45 minutes. (You don't even need a cherry pitter if you've got a bottle and a straw — or if don't mind giving your dentist anxiety.)

Blend some flour, sugar, eggs, and milk until smooth, adding vanilla bean, almond or vanilla extract, or even liqueur like kirsch or amaretto as you see fit, then pour this batter over the cherries that you've scattered in the baking dish. Set a timer for 45 minutes.

As the clafoutis bakes, the batter puffs, subsuming the cherries; it says eggy and spongey in the middle while crisping and browning along the perimeter — and that textural dichotomy certainly means you must try at least one scoop from each area.

2. THE I-NEED-CAKE-NOW CAKE

Yogurt Cake = Eggs + Yogurt + Flour + Sugar + Oil

You don't even have to cream butter and sugar — or get out the measuring cups. If you use two 4-ounce tubs of yogurt, you can use those as your guide: Add 1 1/2 tubs of sugar, 4 tubs of flour, and 1 scant tub of vegetable oil.

This cake may be foolproof, but you will want to be careful not to over-mix the batter and to monitor the cake so it's neither over- nor under-baked. And if you're looking to give your cake some flare, try modifying it as you would pound cake. Or take a cue from Dorie Greenspan, who perfumes her sugar with lemon zest before mixing it into the other ingredients.

3. THE SHATTERINGLY CRISP SANDWICH COOKIE

Pailes = Puff Pastry + Eggs + Sugar + Flour + Jam

You've seen a palmier (call it an elephant ear, if you wish). But get a bit more involved with your folding, slicing, and positioning, and you can transform that same sheet of puff pastry (store-bought, bien sûr!) into the fancy-looking sandwich cookies known as pailles, meaning "straws."

You'll roll the puff pastry into a big square, then fold it in half two times, being sure to brush it with egg wash and sprinkle it with sugar between each fold for maximum caramelization. Next, you'll slice the folded pastry into thin fingers, which you'll then reunite into groups of three. Before putting the cookies in the oven, you'll cover them with a sheet of parchment paper and an upside-down cooling rack so that they bake more up than out. Halfway through baking, you'll remove those weights, press the cookies with a spatula, and flip them. Sounds like a lot of work — but it's more assembly than anything else.

Once the cookies are cool, you'll sandwich them with jam (or, bonne idée, lemon curd) and dust them with confectioners' sugar. And finally, gather your napkins. "The pastries are very brittle, and the sweet jam is very soft, so that when you bite into them, there's always a little ooze and lot of crackle and crumbs," writes Dorie Greenspan in Baking Chez Moi. A welcome mess!

4. FLAVOR OF CHOCOLATE BAR, FLUFF OF MARSHMALLOW

Chocolate Mousse = Chocolate + Eggs + Sugar + Cream

No funny business here: This chocolate mousse is simply melted chocolate that's thickened with egg yolks and lightened with whipped egg whites. Like your favorite chocolate bar frolicked among the clouds.

If you're comfortable whipping egg whites and incorporating them gently, as to not deflate that hard-earned air, then the recipe — which is from Dorie Greenspan's Around My French Table and has been published on NPR and in Bon Appétit — will be a cinch. Perhaps that's because Dorie, when she implored her friend Martine for the ingredients and instructions of her favorite mousse, was handed a Nestlé chocolate bar: All of the information was on the back.

5. CARAMELODY

Crème Caramel = Sugar + Milk + Cream + Eggs + Vanilla Extract

Okay, you daredevils: This one's for you. It's the most challenging dessert in our quintet because you have to make caramel and custard and endure a 12-hour chilling period. And once that's all squared away, you must then invert the crèmes and cross your fingers that they slide out of the ramekins in good shape. If that doesn't make your heart rate increase, might I suggest bungee jumping?

But the results are worth it: a quivering pudding with a waterfall of caramel that sweetens every bite. To take the recipe a step further, infuse your cream — with crushed cardamom pods, orange zest, chopped coffee beans, Earl Grey tea leaves, or fresh herbs — before you begin.

Saturday, June 17, 2017

Cheesy Salsa Verde Rice & Beans Breakfast Bowl

I'm a big fan of hot breakfasts, especially in winter when I crave something hot and hearty to kick off the day. One of my favorite hot breakfasts since high school is a bowl of brown rice and kidney beans topped with a fried egg. My dad used to make these breakfast bowls on weekends, and in recent years, I've kicked the bowl up a notch.

For a quick breakfast, I use a bag of microwavable brown rice to cut down on prep time. Kidney beans are cooked in a skillet just until heated through along with minced shallot, crushed garlic, salt, and pepper. So simple, but a delicious and flavorful breakfast bowl base.

Add the brown rice to the bottom of a bowl, then top with the cooked kidney beans. Sprinkle shredded cheddar immediately over top so the heat of the rice and beans melts the cheese. Drizzle salsa verde over the melted cheese, then add a fried egg over top to finish off the breakfast bowl.

I prefer an over easy egg for my breakfast bowl. Once slice of the egg with a fork breaks the yolk, and a good stir combines all the ingredients together into a savory breakfast with a kick.

I love Trader Joe's Salsa Verde, but if you have time, you can make your own and enjoy the rest of the week.

For more protein boost, you can use quinoa instead of brown rice. You could also add sausage, ham, crumbled bacon, or another meaty protein of choice. Instead of a fried egg, you could top the bowl with a poached egg. Egg-Free? Top with scrambled tofu or crispy tofu. Make the bowl your own!

What You'll Need
1 1/2 cups cooked brown rice
15.5oz kidney beans, drained and rinsed
1/2 tsp extra virgin olive oil
1 shallot, minced
2 cloves garlic, crushed
2 large eggs, cooked over easy
1/4 cup shredded sharp cheddar cheese, divided
3 tbsp salsa verde, divided

How to Make It
Cook brown rice according to package directions. Set aside and keep warm. (As a short cut, you can use a freezer bag of brown rice and steam cook in the microwave).
In a medium-sized skillet heat olive oil over medium heat. Add minced shallot and cook until softened, 2-3 minutes. Add the kidney beans, season with salt and pepper, crushed garlic, and cook for 5 minutes until heated through.
As beans are cooking, fry to eggs in a separate skillet.
Divide rice and beans between two bowls. Top the beans and rice with cheese, salsa verde, and fried egg. Enjoy immediately.

Reminder: Always make sure your work surfaces, utensils, pans and tools are free of gluten. Always read product labels - not all brands are created equal. Manufacturers can change product formulations without notice. When in doubt, do not buy or use a product before contacting the manufacturer for verification that the product is free of gluten.

Monday, May 15, 2017

Vegan Barley, Wild Rice and Cranberry Pilaf

Make a healthy whole grain barley pilaf recipe made with wild rice and cranberries and flavored with orange juice, a touch of salt and fresh parsley, with chopped walnuts for extra texture and protein. Barley pilaf is a nutritious and high-fiber side dish or vegetarian main dish.

Or, use this mixed grain pilaf to stuff an acorn squash or another oven-roasted fall squash for a colorful fall or Thanksgiving dinner entree.

What You'll Need
3/4 cup pearl barley
1/4 cup wild rice
1/2 tsp salt
3 cups water
1 cup orange juice
3/4 cup dried cranberries
2 tsp lemon juice
1 tbsp onion, finely chopped
1/3 cup olive oil
salt and pepper to taste
1/4 cup chopped fresh parsley
1 cup walnuts, coarsely chopped

Optional: Feta cheese, greens for serving

How to Make It
In medium saucepan with lid, bring water to a boil. Add pearl barley, wild rice and salt; return to boil. Reduce heat to low, cover and cook about 40 minutes or until barley is tender but chewy.

While the barley and wild rice mixture is cooking, pour the orange juice over the dried cranberries and set aside.

Drain any excess liquid from cooked barley and rice mixture. Place barley and wild rice in large bowl.

Drain cranberries, reserving 5 tablespoons orange juice. Toss cranberries with barley and wild rice.

Mix reserved orange juice with lemon juice and onion. Whisk in olive oil and season to taste with salt and pepper. Pour dressing over barley mixture. Add chopped parsley and toasted walnuts; mix well.

If you're not eating vegan, you may want to top your cranberry pilaf off with a bit of crumbled feta cheese; or, to turn it into a salad for lunch, plate it with a few greens, either on a bed of butter lettuce or romaine lettuce leaves, or, some mesclun greens, arugula or kale italia.

Serve at room temperature or chilled.

Makes 6 servings.

Tuesday, April 11, 2017

Lentils With Sweet Potatoes and Kale

This tasty, nutrient-rich lentil dish is easy to prepare and makes a satisfying meat-free meal.

For a heartier dish (not vegetarian), feel free to add some chopped ham to the pan along with the onions or garnish the finished dish with some smoky cooked crumbled bacon. Diced carrots can be added to the lentils as well.

What You'll Need
1 tablespoon extra virgin olive oil
1 medium onion, chopped
1 medium sweet potato, peeled and diced, about 1 1/2 cups
2 cloves garlic, minced
10 to 12 ounces frozen mixed greens or chopped kale
1 cup red lentils
1 large bay leaf
1/2 teaspoon dried leaf thyme
1/2 teaspoon ground cayenne pepper
4 cups vegetable broth (or chicken broth)

How to Make It
In a medium saucepan or Dutch oven over medium heat, heat the olive oil.

Add the chopped onion and diced sweet potato to the pan and cook until the onion is softened, about 5 minutes.

Add the minced garlic and cook for 1 minute longer.

Stir in the mixed greens or chopped kale, lentils, bay leaf, thyme, cayenne pepper, and the vegetable broth or chicken broth. Bring to a boil. Reduce the heat to low, cover, and simmer for about 25 to 35 minutes, or until the lentils are tender but not overcooked and mushy.

Add salt, to taste.

Serves 4.

Serve with a tossed salad for a satisfying family meal.

Tips and Variations

Add diced ham or diced smoked sausage to the dish along with the onions.

Saturday, March 18, 2017

Easy Green Beans and Bacon

Butter, bacon drippings, and crumbled freshly cooked bacon flavor these fresh green beans perfectly.

The recipe is a popular one, and it is delicious! To cut back on the fat a bit, discard most of the bacon drippings before you add the butter and cooked green beans to the pan. See some other ideas and possible add-ins in the tips and variations section.

What You'll Need
2 pounds fresh green beans
8 strips bacon, diced
3 tablespoons butter
freshly ground black pepper, to taste
salt, to taste

How to Make It
Wash the green beans in a colander under cold running water. Top and tail them (slice off the stem ends and tail ends) and then cut them into 1- to 1 1/2-inch lengths. Set aside.

Heat a large skillet or sauté pan over medium heat; add the diced bacon.  Fry the bacon until crispy; remove to paper towels to drain. Leave 2 to 3 tablespoons (or more) of the bacon drippings in the skillet and save the remaining drippings for another recipe.* Set the skillet aside.

Bring a pot of salted water to a boil over high heat and then add the beans. Boil for about 8 to 12 minutes, or until desired doneness is reached.

Drain the green beans and then add them to the skillet along with the cooked bacon and the butter. Toss well and heat until the green beans are thoroughly coated and hot.

Sprinkle the green beans with freshly ground black pepper and salt, to taste.

*Bacon drippings can solidify and cause clogged drains, so don't pour them down the drain. If you are going to discard the drippings, pour them an empty can and let stand until the grease has solidified and then toss the can in the trash.

Tips and Variations

Use frozen green beans, steamed following the package directions.
Use trimmed fresh wax beans in place of the green beans, or a combination of the two.
Bake the bacon in the oven. Heat the oven to 375° F and line a rimmed baking sheet with foil. Arrange the strips of bacon in the pan and bake in the preheated oven for about 22 to 26 minutes, or until the bacon is crispy. Reserve some of the drippings for the green beans and drain the bacon on paper towels. Proceed with the recipe.
Before you add the cooked green beans to the skillet, saute (medium-low heat) a finely minced or pressed clove of garlic and/or a few tablespoons of finely minced shallots in the butter and bacon drippings for about 2 minutes, or until tender. Add the cooked and drained green beans and bacon; toss, heat, and season with salt and pepper.

Monday, February 20, 2017

Gluten-Free Caprese Chicken

A delicious and elegant dinner that doesn't take long to prepare IS possible on a busy weeknight. This gluten-free chicken dish is filling, packed with flavor, and takes less than 30 minutes to bake.

Mayonnaise may seem like an odd ingredient to combine with chicken (this recipe is actually adapted from a recipe on a Hellmann's jar!) A thin layer over top a boneless, skinless chicken breast helps lock in moisture and flavor. When combined with dried minced onion, the mayonnaise layer forms a scrumptious crust over the chicken.

I used Hellmann's Mayonnaise with Olive Oil because it contains fewer calories and less fat than regular mayonnaise, but you can use whichever brand of mayonnaise you prefer (ensuring it is gluten-free of course, always read labels!)

Once the chicken is nearly done baking, low moisture part skim shredded mozzarella is added to create a second layer of deliciousness. To finish off chicken with traditional Caprese style flavors, sliced tomatoes are arranged over top followed by freshly chopped basil.

Really want to kick the flavor up a notch? Finish off the dish with a drizzle of balsamic reduction, which is super easy to make from scratch.

What You'll Need
2 medium boneless, skinless chicken breasts
1/4 cup gluten-free all-purpose flour (I use Bob's Red Mill)
kosher salt and black pepper, to taste
2-3 tbsp mayonnaise (I use Hellmann's Mayonnaise with Olive Oil)
1/4 tsp red pepper flakes
1/2 tsp onion powder
1/4 tsp garlic powder
3-4 tsp dried minced onion
1/4 cup low moisture part skim shredded mozzarella (or more, for a really cheesy chicken)
1 large tomato, sliced
5-6 large fresh basil leaves, coarsely chopped (I snip with kitchen scissors)
drizzle balsamic reduction (either a store bought gluten-free version, or homemade)

How to Make It
Preheat oven to 425 F. Line a rimmed baking sheet with parchment paper or a silicone mat.
Add the gluten-free flour to the bottom of a shallow dish. Season generously with sea salt and pepper and whisk with a fork to combine.
Rinse the chicken breasts and pat dry with a paper towel. Coat both chicken breasts completely in the gluten-free flour, shaking gently to remove excess flour. Place both chicken breasts on the lined baking sheet.
Evenly distribute the mayonnaise between the two chicken breasts, using a small spatula or the backside of a spoon to completely coat the tops and sides with a thin layer of mayonnaise.
Sprinkle the dried seasoning on top of the mayonnaise layer, adding the minced onion last.
Bake the chicken breasts for 20 minutes. Remove from oven and add a layer of shredded mozzarella over top each breast. Bake for an additional 5 minutes, until cheese is melted and chicken is completely cooked through.*
Remove chicken breasts from oven and let sit 5 minutes. Arrange 2-3 slices of tomato over top each breast, followed by freshly chopped basil. Finish with a drizzle of balsamic reduction. Serve immediately.
*Be sure to cook the chicken completely through to reduce the risk of food borne illness.

Reminder: Always make sure your work surfaces, utensils, pans and tools are free of gluten. Always read product labels to confirm the product is gluten-free. Manufacturers can change product formulations without notice. When in doubt, do not buy or use a product before contacting the manufacturer for verification that the product is free of gluten.

Sunday, January 15, 2017

Easy Homemade Chicken Pad Thai

If you're one of the many people who has trouble finding special Asian ingredients like tamarind paste, not to worry - you can still create delicious pad Thai without it. In fact, the original pad Thai didn't contain tamarind at all (the makings of pad Thai being brought to Thailand via the Chinese), and the following recipe is based on this earlier version of the dish. When I was last in Thailand, I went back to the same pad Thai street seller every day because of her amazing pad Thai, and it wasn't until just before I left that she told me how she makes it (without tamarind). If you're living in a place where Asian ingredients are difficult to find, then this [tamarind-free] recipe might just make your day. Enjoy!

What You'll Need
9 oz./250 g. pad Thai rice noodles (click on the link to see what these look like)
3/4 lbs./.34 kg. boneless chicken thigh or breast, cut into small pieces or strips
1.5 tablespoons soy sauce*
4 cloves garlic, minced
1 fresh red or green chili, sliced
1 thumb-size piece galangal OR ginger, grated
4 green onions, sliced
1 egg
2-3 cups bean sprouts
1/3 cup dry-roasted unsalted peanuts or cashews, ground or roughly chopped with a knife
1 fresh lime, sliced into wedges
2 tablespoons vegetable oil
Pad Thai Sauce (without tamarind*)
1/3 cup good-tasting chicken stock
3 tablespoons rice vinegar (or substitute white vinegar)
1 tablespoon lime juice
3-4 tablespoons brown sugar
2 tablespoons fish sauce
1 tablespoons soy sauce*
1/8 teaspoon white pepper

How to Make It
Place prepared chicken in a bowl and toss with 1.5 Tbsp. soy sauce. Set aside.
Combine 'pad Thai sauce' ingredients together in a cup, stirring well to dissolve sugar. Note that this sauce needs to taste sweet first, followed by sour and then salty to create good pad Thai. Set aside.
Bring a large pot of water to boil. Dunk in rice noodles and switch off heat. Allow noodles to soak approximately 6 minutes, OR until soft enough to bend easily, but still firm and 'undercooked' by regular standards (this is the key to good pad Thai, so be sure not to over-soak or boil the noodles. They will finish cooking later). Drain and rinse noodles briefly with cold water to keep from sticking. Set aside.
Heat a wok or large frying pan over medium-high heat. Drizzle in the oil and swirl around, then add the garlic, chili, galangal/ginger, and half of green onion (or just the white parts), reserving remaining for later. Stir-fry 1 minute to release the fragrance.
Add chicken and stir-fry 3-4 minutes, or until cooked. If pan becomes dry, add 1-2 Tbsp. of the pad Thai sauce, just enough to keep ingredients frying nicely.
Push ingredients aside and crack an egg into the center of the pan. Stir quickly to scramble, then combine with other ingredients.
Add prepared noodles plus 3-4 Tbsp. of the pad Thai sauce. Using two utensils, lift and turn noodles to stir-fry and combine with other ingredients. Continue frying in this way, adding more of the sauce every minute or two, until all sauce has been added and the noodles are chewy-delicious and a little bit sticky (8-10 minutes). When sauce has been absorbed and noodles are cooked, fold in the bean sprouts (you want them to stay crispy).
Remove from heat and taste-test, adding more fish sauce until desired taste is achieved (I usually end up adding 1-2 Tbsp. fish sauce, but I like mine on the salty side). Portion out onto individual plates and add a lime wedge on the side. Before eating, top with remaining green onion and squeeze over the lime wedge, then finish with a generous sprinkling of chopped/ground nuts. For those whole like it extra spicy, serve with Thai chili sauce on the side, and ENJOY!

*Note: Although today we associate pad Thai sauce with tamarind, in this authentic southern-Thai recipe, the sourness comes from a combination of rice vinegar and lime juice instead. Traditionally (several hundred years ago), pad Thai was made in just this way - without tamarind - and versions of this original formula can still be found in various regions of Thailand. This particular recipe was taught to me by a local Thai chef in south-western Phuket, Thailand.